Understanding Island Lighting and Its Benefits
When considering kitchen design, island lighting is often an essential element that sets the tone for the space. It plays a crucial role in both functionality and aesthetics, enhancing the usability and beauty of your kitchen island. This article delves into the nuances of island lighting, its benefits, and how to effectively incorporate it into your home. From understanding its importance to selecting the right fixtures, we’ve got you covered.
What is Island Lighting?
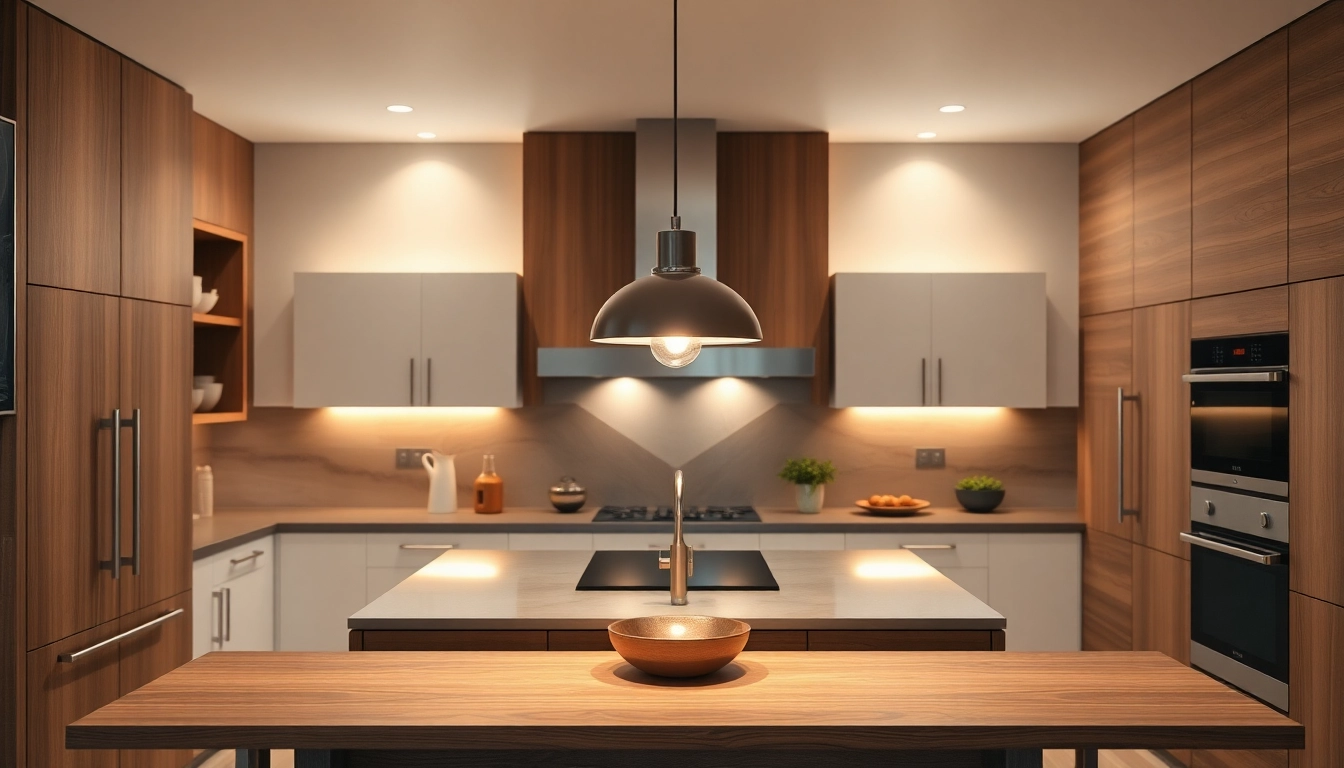
Island lighting typically refers to lighting fixtures specifically designed to illuminate kitchens, particularly the area above a kitchen island. These fixtures can vary widely in design, style, and form. Common varieties include pendant lights, chandeliers, and recessed lighting, each providing unique characteristics that can complement different kitchen themes. Most importantly, island lighting is designed not just for illumination but to serve as a focal point in your kitchen design.
The Importance of Lighting in Interior Design
Lighting is a fundamental aspect of interior design with the power to transform moods, create spaces, and guide actions. It sets the atmosphere in any room, but in kitchens, it’s especially significant due to tasks such as cooking, eating, and entertaining. Effective lighting also highlights architectural features and kitchen accessories, ensuring each corner of the space is pleasing to the eye while remaining functional.
Benefits of Using Island Lighting in Your Home
Island lighting brings numerous benefits to your kitchen. Here are some key advantages:
- Improved Functionality: Properly placed island lighting enhances visibility while cooking and other food preparation tasks.
- Aesthetic Appeal: A stylish light fixture can serve as a stunning statement piece, communicating your design preferences and personality.
- Enhanced Ambiance: Adjusting the lighting can shift the mood of the kitchen from bright and functional during meal prep to cozy and warm during family gatherings.
- Increased Property Value: Thoughtful lighting choices can boost the overall value of your home by enhancing its visual appeal.
Choosing the Right Island Lighting Fixture
Types of Island Lighting Fixtures Available
When it comes to island lighting, there are various types of fixtures, each offering its own advantages:
- Pendant Lights: These hanging fixtures come in various designs and can be installed singly or in groups. They provide direct light and can accentuate the island’s design.
- Chandeliers: For a more sophisticated look, chandeliers can add elegance while providing ample light. They work well in larger spaces.
- Track Lighting: This flexible option allows for adjustable lighting positioning and can illuminate your island effectively.
- Recessed Lighting: Installed in the ceiling, these fixtures save space and provide a clean look while offering ambient lighting.
Factors to Consider When Selecting Fixtures
Selecting the right island lighting goes beyond aesthetics. Consider the following factors:
- Size of Your Island: Choose fixtures that are proportional to the size of your island to avoid overwhelming or under-lighting the area.
- Height of the Ceiling: The height of your ceiling will impact your choice of fixture. Pendant lights, for example, should hang at a height that allows for free movement.
- Style and Theme: Your fixtures should complement your overall kitchen design—whether modern, rustic, or traditional.
- Light Output: Consider the wattage and intensity of the light to ensure it meets your functional needs.
Matching Fixtures with Your Kitchen Style
Alignment of your island lighting with the kitchen’s style is paramount for creating a cohesive look. For instance:
- Modern Kitchens: Sleek, minimalist designs work well with geometric pendant lights or simple chandeliers.
- Rustic Kitchens: Opt for fixtures made from natural materials like wood or wrought iron to enhance the traditional feel.
- Contemporary Spaces: Bold, artistic fixtures can serve as conversation starters, adding character to your kitchen.
Installation Tips for Island Lighting
Tools and Materials Needed for Installation
Before beginning installation, gather the necessary tools and materials:
- Drill
- Screwdriver
- Wire cutters/strippers
- Voltage tester
- Electrical tape
- Mounting hardware (included with fixture)
Step-by-Step Installation Guide
Installing your island lighting fixture can be straightforward with the right approach:
- Turn Off Power: Always turn off the electricity at the circuit breaker before starting.
- Attach Mounting Bracket: Secure the mounting bracket to the ceiling according to the manufacturer’s instructions.
- Connect Wires: Match the fixture’s wires with the corresponding wires in your ceiling (black to black, white to white, and green or copper for ground).
- Attach Fixture: Secure the fixture to the mounting bracket, ensuring it’s securely fastened.
- Restore Power: Turn the electricity back on and test the fixture.
Common Mistakes to Avoid
Avoid these common pitfalls during installation:
- Not considering the height of your fixtures, which can obstruct views and cause inconvenience.
- Choosing fixtures that are either too small or too large for the island.
- Failing to ensure adequate brightness for the tasks performed at the island.
Enhancing Ambiance with Layered Lighting
What is Layered Lighting?
Layered lighting involves combining different types of lighting to create depth and visual interest in a space. The three main types of lighting include ambient, task, and accent lighting. By integrating these elements, you elevate the overall design and functionality of your kitchen.
Combining Island Lighting with Other Light Sources
To achieve a well-lit kitchen, consider using a combination of lighting sources. For example, pair your island lighting with:
- Recessed Ceiling Lights: For general illumination that keeps the space bright.
- Under-Cabinet Lights: To illuminate countertops and workspace areas efficiently.
- Wall Sconces: To create warm ambient lighting and highlight specific areas.
Creating Mood with Color Temperature
The color temperature of your lighting can significantly affect the mood of your kitchen. Opt for:
- Warm White (2700K-3000K): This range offers a cozy and inviting atmosphere, ideal for family gatherings.
- Cool White (3500K-4100K): Provides a balanced light that’s excellent for task-oriented areas like prep zones.
- Daylight (5000K-6500K): Best for kitchens that require high visibility, mimicking natural light for accurate color representation.
Maintenance and Upkeep of Island Lighting
How to Clean and Care for Your Lighting Fixtures
Regular cleaning helps your fixtures continue to shine beautifully. Follow these care tips:
- Dust fixtures regularly to remove any buildup that can dim their brightness.
- Gently clean glass shades and bulbs to enhance light clarity.
- Use appropriate cleaning materials to avoid damaging finishes or surfaces.
When to Replace Bulbs and Fixtures
Knowing when to replace bulbs or fixtures can keep your kitchen looking fresh and functional. Consider these signals:
- If a bulb frequently burns out or flickers, it may be time to replace it.
- Watch for discoloration, which can indicate that fixtures are old and need replacement.
- Should light quality fade, it might be due to age, requiring an upgrade to newer models.
Upgrading Your Island Lighting: Tips to Consider
If you’re considering upgrading your island lighting, hey, here are tips to ensure a successful transition:
- Evaluate your existing fixtures to identify what works well and what doesn’t.
- Consider energy-efficient LED options for lower energy consumption and longer lifespan.
- Experiment with different styles and heights to find what best suits your space.
Frequently Asked Questions (FAQs)
1. What height should island lighting be installed at?
Typically, island lighting should hang 30-36 inches above the countertop to provide adequate illumination and maintain visibility.
2. Can I use more than one type of fixture for island lighting?
Absolutely! Mixing different fixtures adds depth and interest; just ensure they complement your overall kitchen design.
3. How can I make my island lighting dimmable?
You can add a dimmer switch to your lighting circuit, allowing you to easily adjust brightness for various activities and moods.
4. How often should I clean my island lighting fixtures?
A monthly dusting is recommended, while deeper cleaning should be performed every few months, depending on buildup.
5. What type of bulbs are best for island lighting?
LED bulbs are highly recommended due to their energy efficiency, longevity, and variety in color temperatures.